A woven belt that carries 48V and hangs in curves between fixed points. There is no channel and nothing to screw along its length — the shape comes from where the nodes go. Written for the electrician on site: print it and take it up the ladder.
Read this before anything else. The belt is not a track you fix to a ceiling — it is a conductor you hang between points, and that changes the order the job is done in.
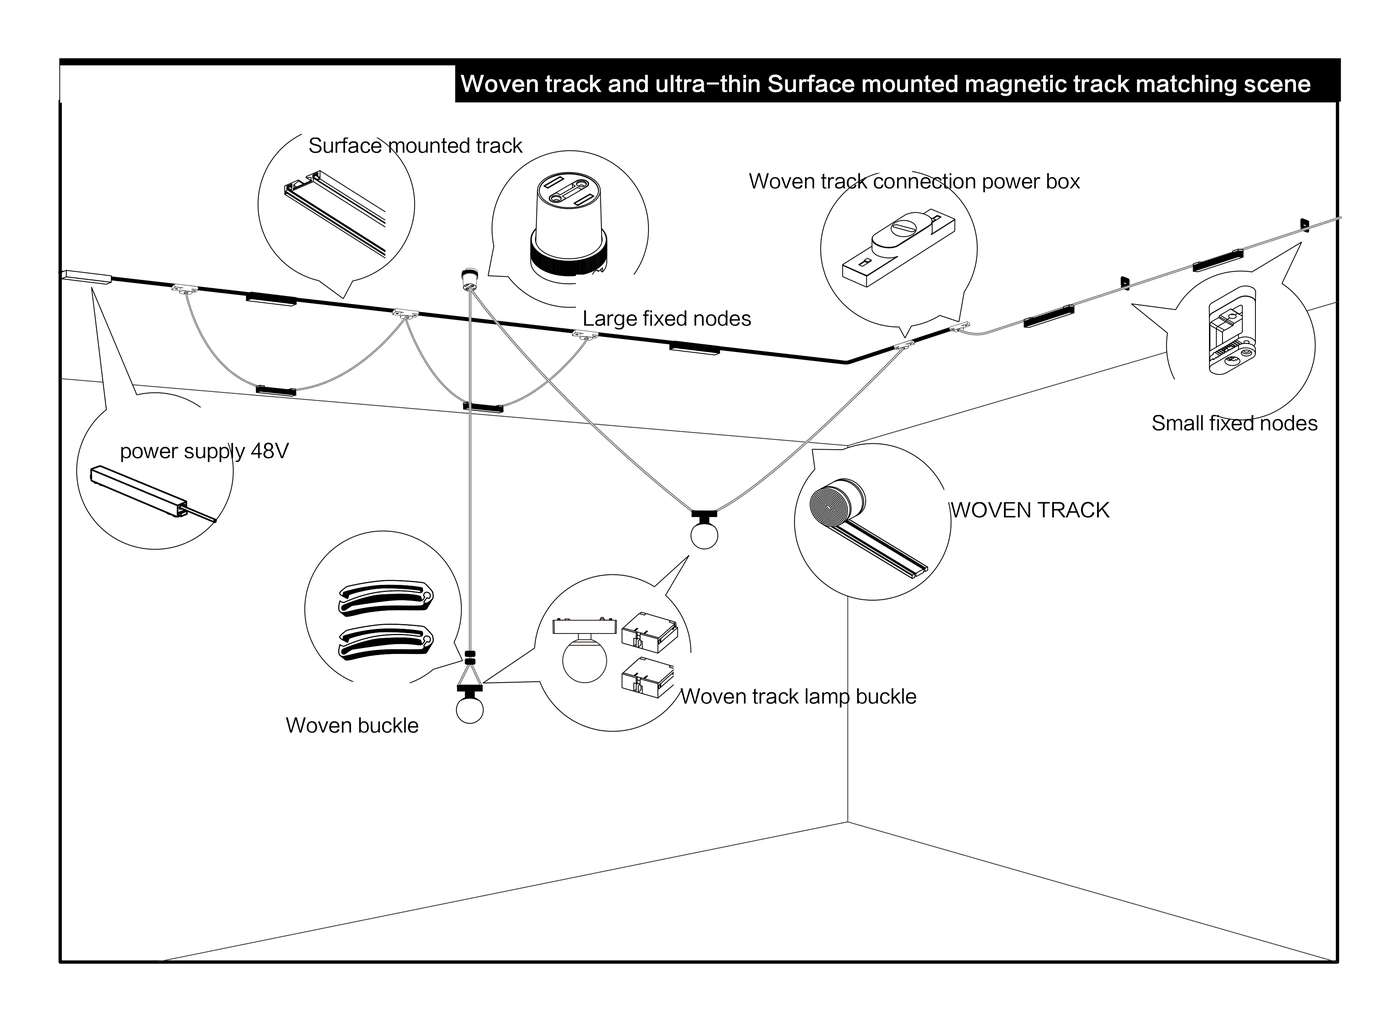
One run, in a room. The belt hangs between fixed nodes, dips through the space and picks up its 48V either from the surface track it meets or from its own supply.
The nodes decide the shape
The belt has no shape of its own. It falls in a curve between two fixed points, so the run is designed by choosing where the nodes go and how much belt is left between them.
The belt is the conductor
Copper runs inside the woven belt, so it carries the 48V along the whole run. There is nothing to wire between luminaires.
It goes up last
Nodes first, power second, belt third, luminaires last. The belt is threaded through fixings that are already holding.
It can share a ceiling with rigid track
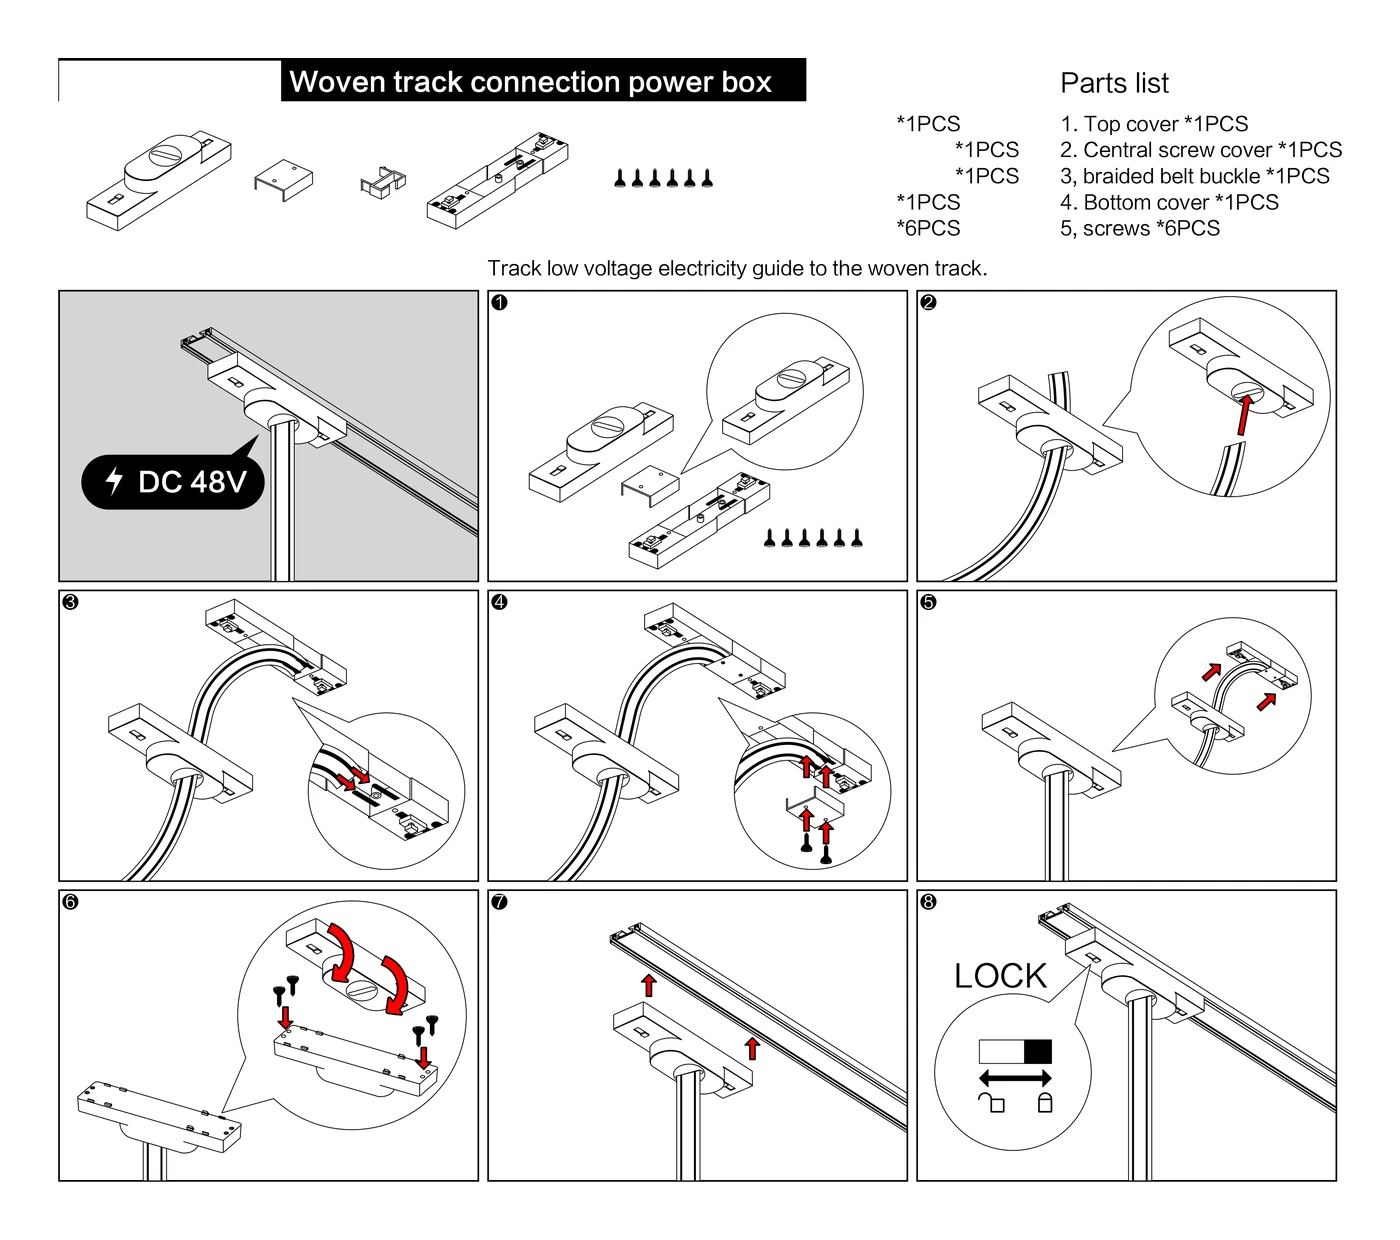
A belt run can take its 48V straight off an Elance' 6mm track already on the ceiling, so the two systems can be designed as one.
The whole system in under a minute: power taken off a track, nodes fixed, luminaires hung. Music, no commentary.
Ten rules. Every one of them is a call-back avoided.
Install to local and national electrical regulations, and only by a licensed electrician who knows how the system goes together.
Isolate the circuit at the distribution board before anything is touched, and prove it dead.
The belt carries 48V DC. Never connect it, or anything on it, to the mains.
One belt run carries 4.2A at most — 200W of luminaires at 48V. Add the wattage up before choosing the supply.
Indoors only, and dry.
Set the node positions out on the ceiling before anything goes up. The nodes decide the shape; the belt only follows the line between them.
Do not kink the belt. It is made to bend in a curve — a sharp fold damages the copper inside it.
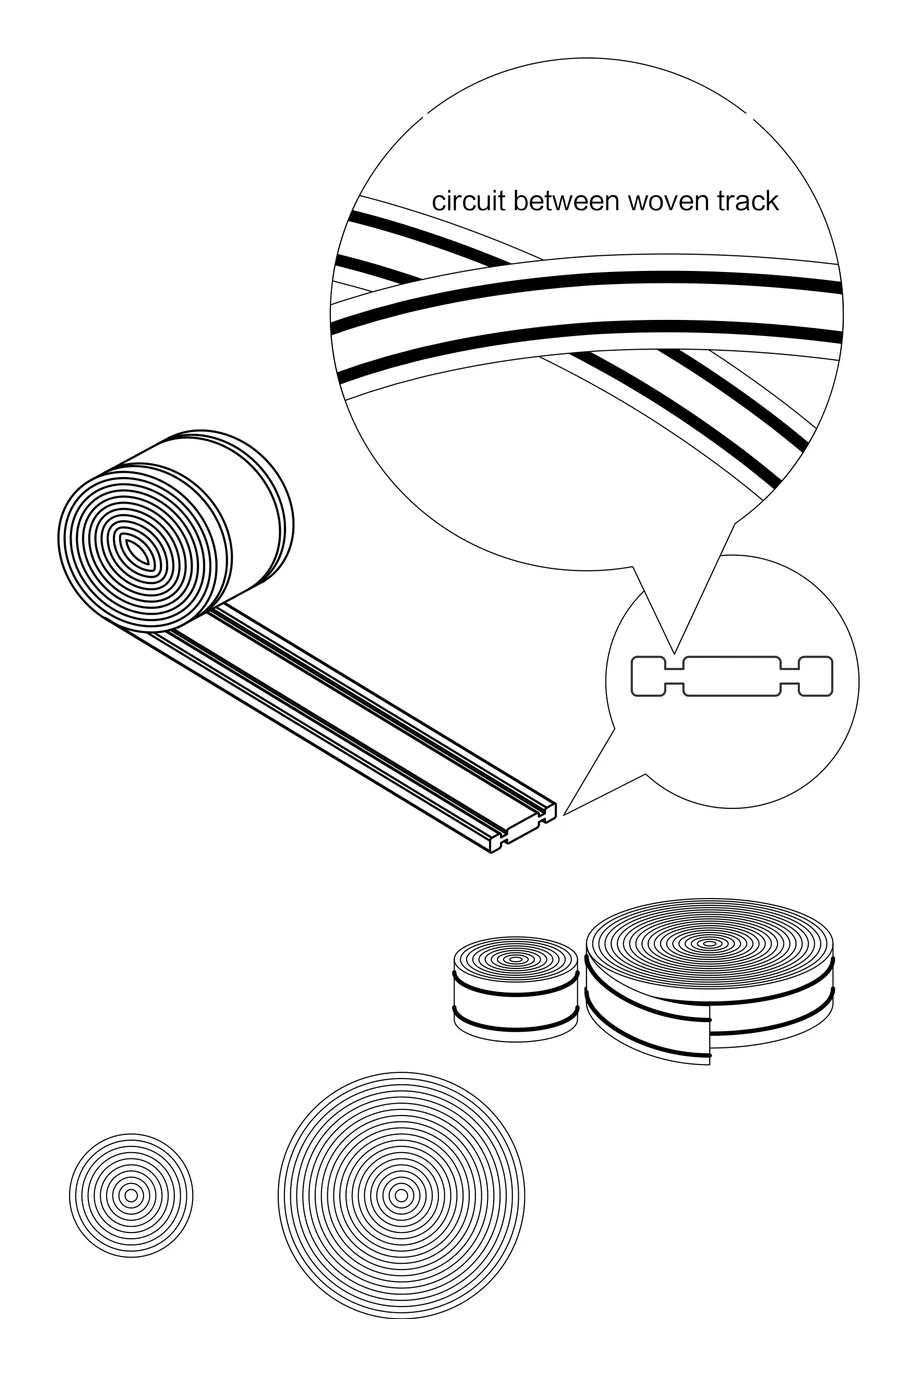
Two belts may cross. The belt is moulded with grooves so that the conductors of one cannot touch the conductors of the other — keep the faces clean and do not trap anything between them at a crossing.
An Elance' luminaire needs two linkers to sit on the belt. The Poke Ball, Conical and Dome are made for the belt and go on nothing else.
The LED light source is not user-replaceable. It is replaced by Enlighten Pro or an authorised agent.
The parts
Everything a run is built from, in the order it goes up. Codes are the price-list codes.
Part
Code
What it does
Fabric belt
EN-CEWT
16.5 × 3mm woven belt with copper conductors inside. Gray or khaki, cut to length from 30m rolls, 10m minimum.
Large fixed node
EN-CEPDYT
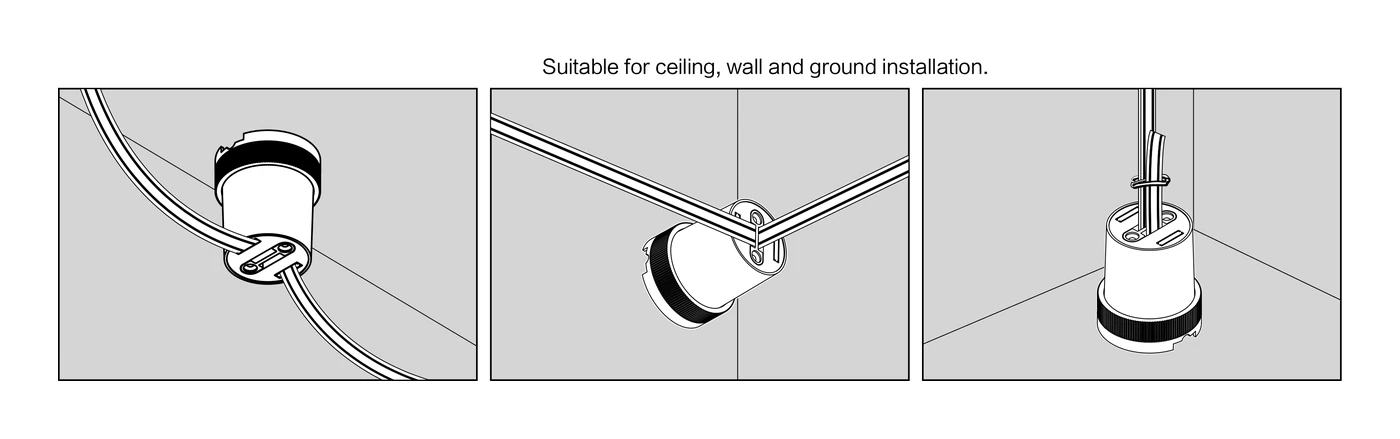
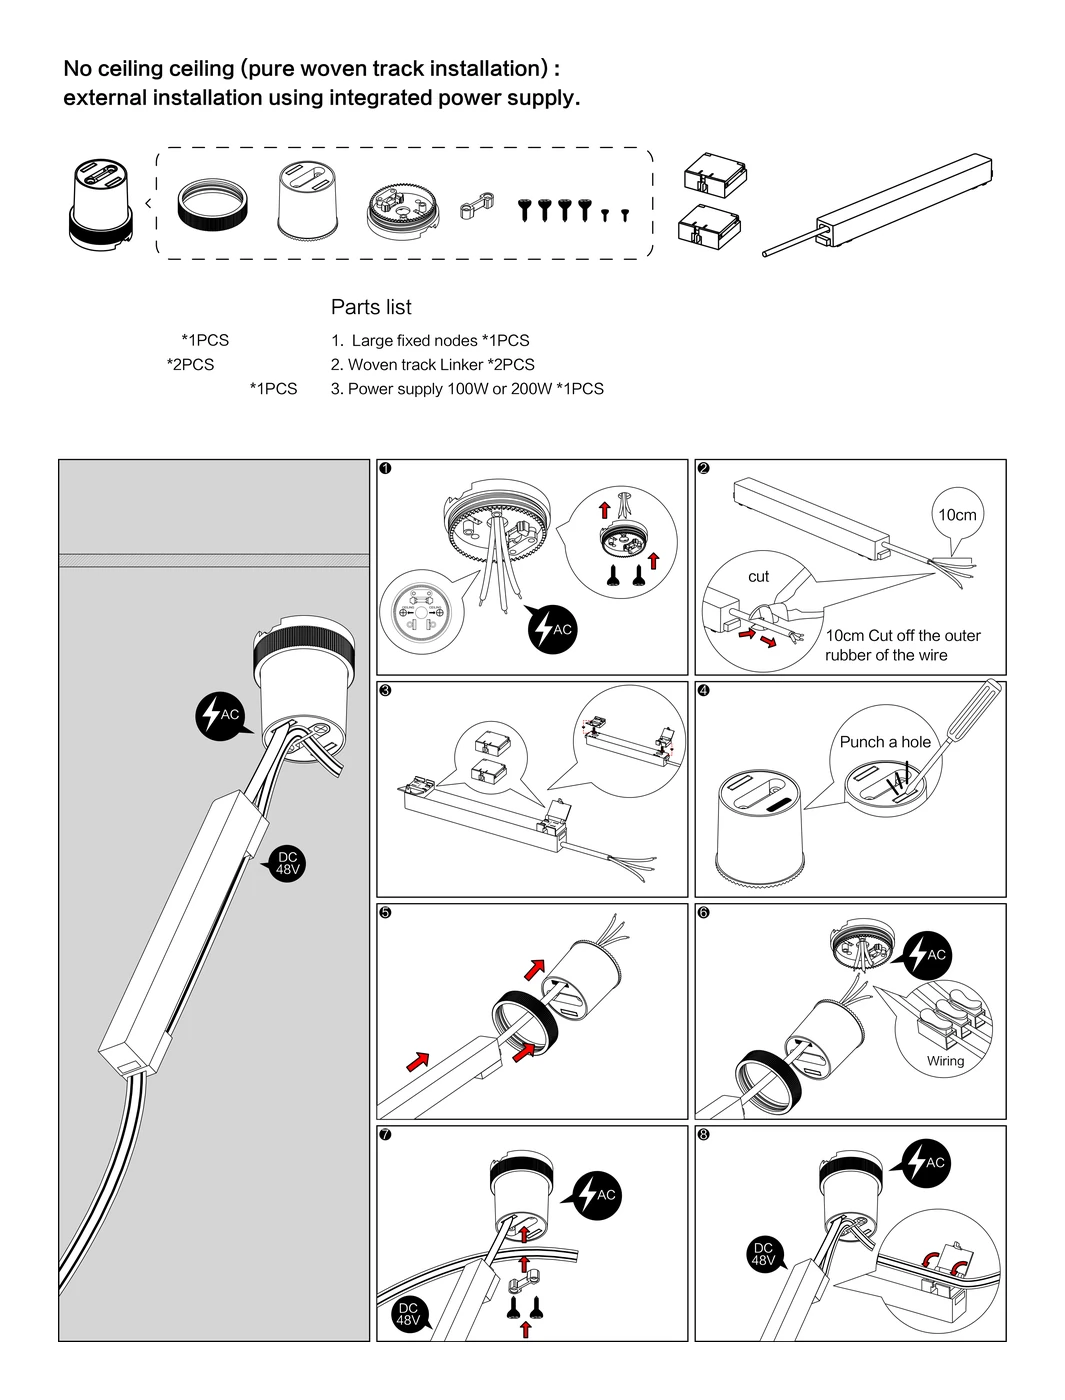
Φ60 × 69mm. The anchor that can also bring power in, turn the run, split it, or join two belts. Ceiling, wall or floor.
Small fixed node
EN-CEPDGK
40 × 30 × 11mm. A plain anchor that holds the belt and adjusts it. No power passes through it.
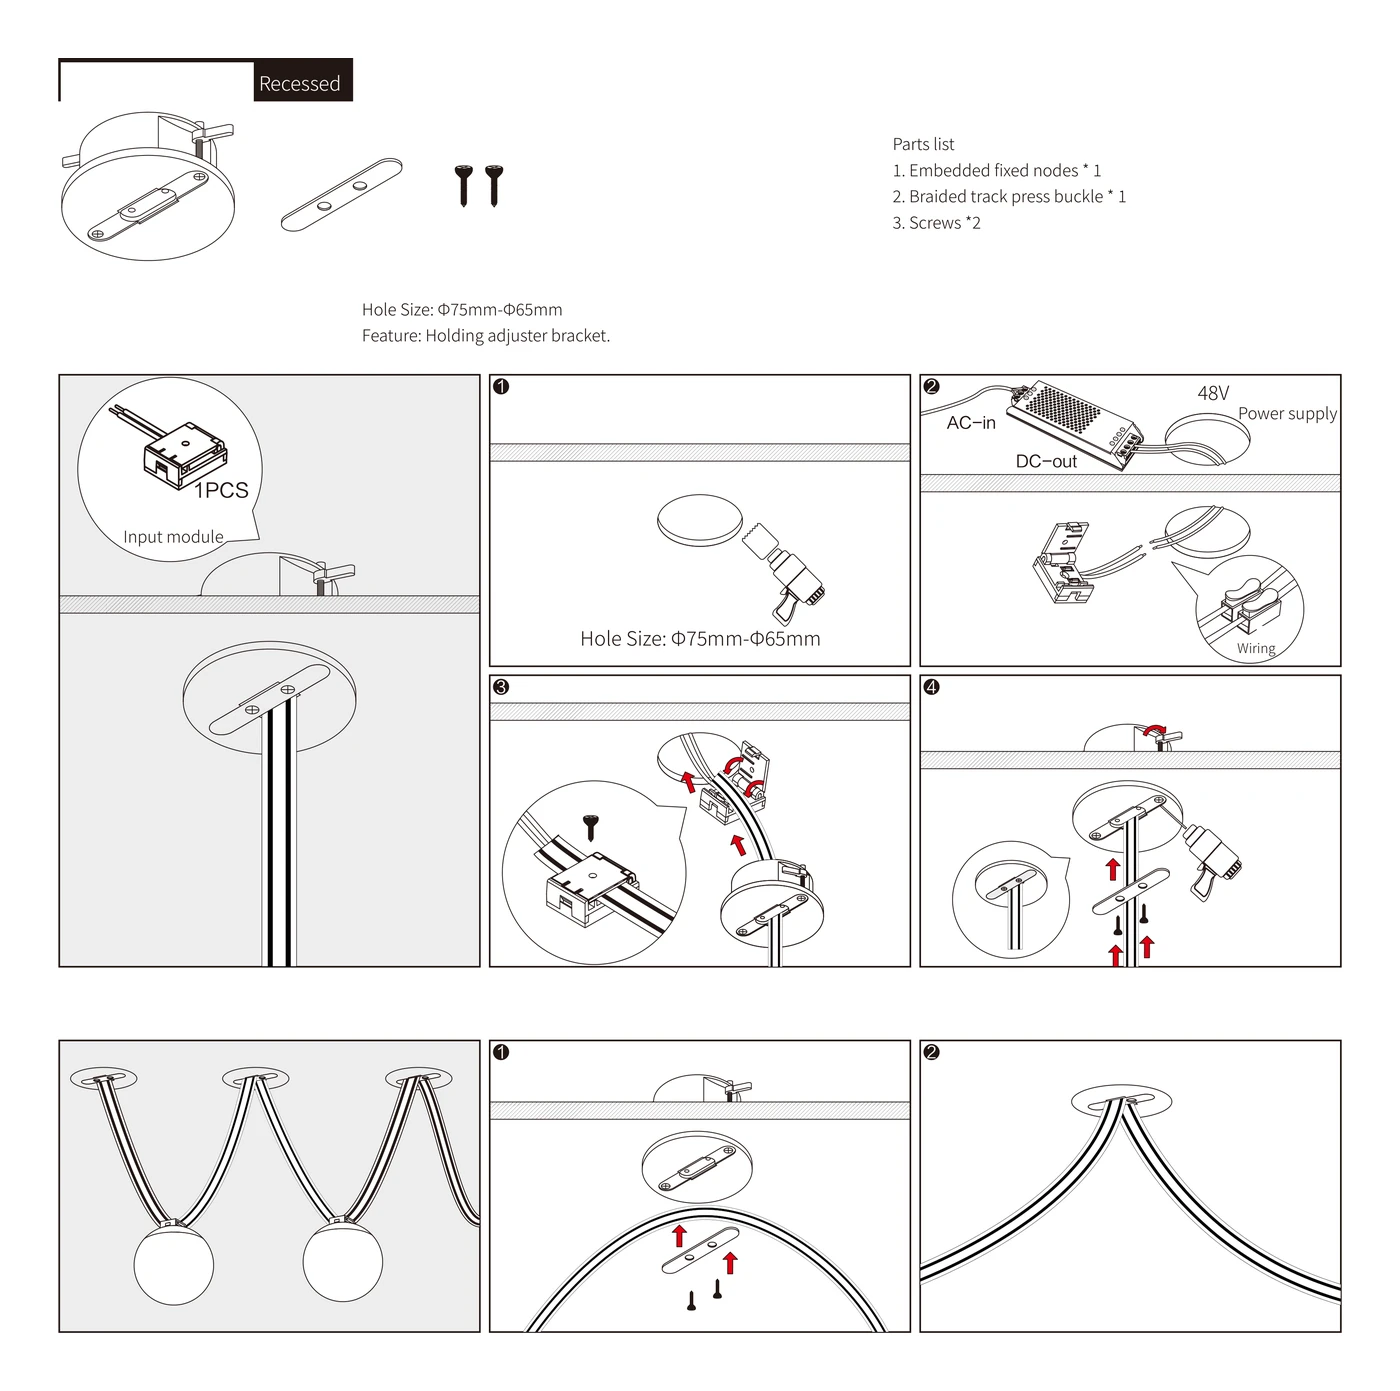
Recessed node
EN-CEPDQR
Φ86 × 27mm, set into a Φ65–75mm hole. The same anchor, flush with the ceiling.
Track connection box
EN-GDH
112 × 26 × 25mm. Takes 48V off an aluminium track and passes it into the belt.
Belt input module
EN-CEPDSR
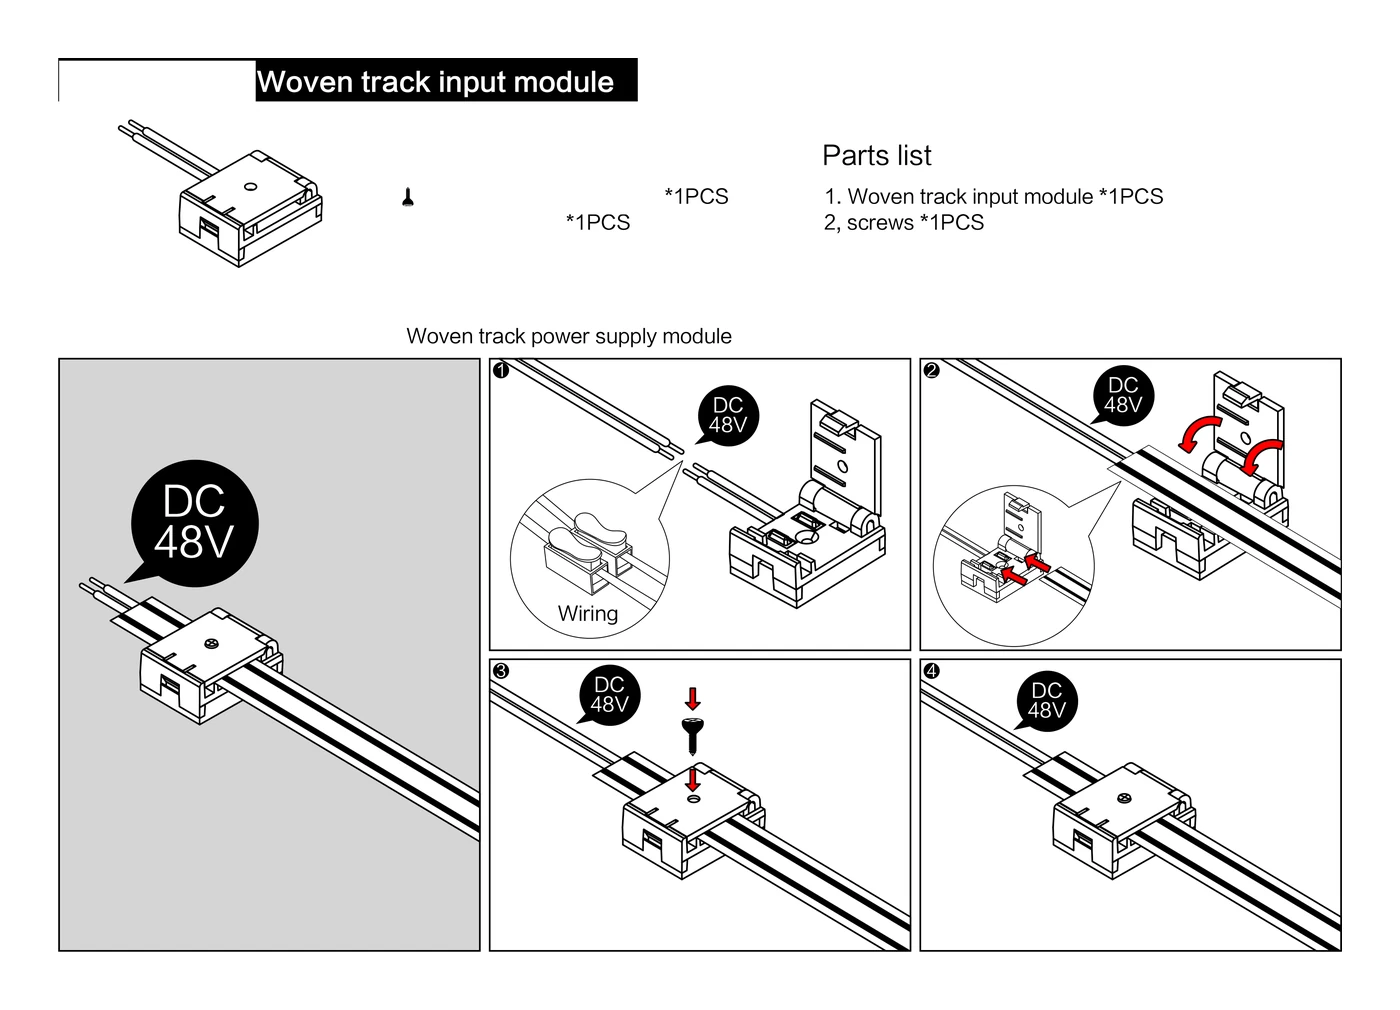
65 × 22 × 31mm. Brings 48V into the belt from a supply above the ceiling.
Linker
EN-CEPDDK
27 × 27 × 10mm. Two per luminaire — what lets an Elance' 6mm luminaire sit on the belt.
Woven buckle
EN-CESJK
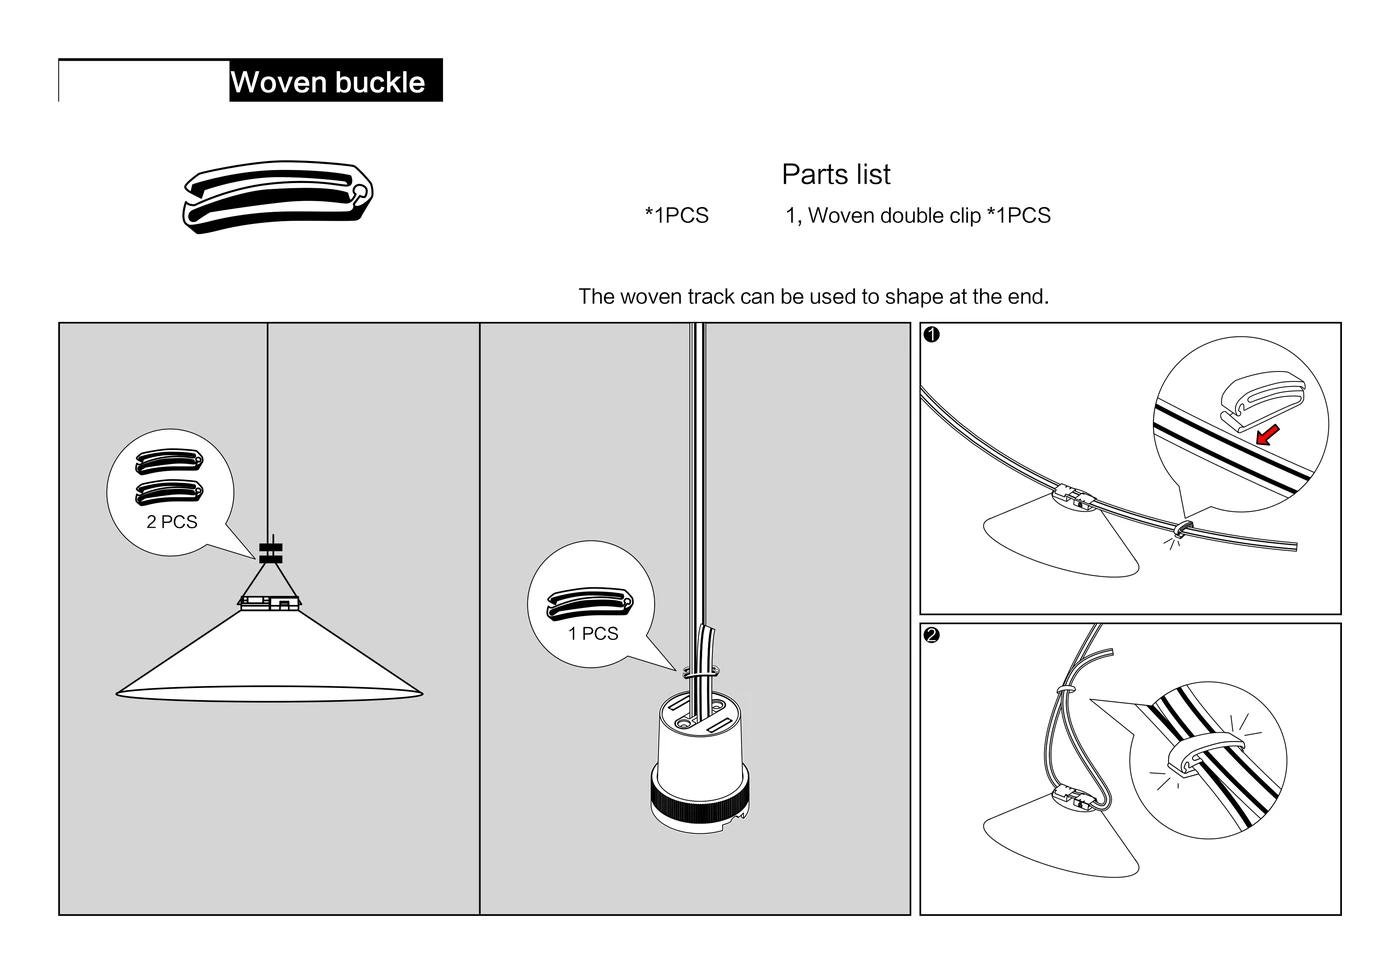
26 × 10 × 6mm. Clamps the belt to shape it, and closes the end of a run.
Poke Ball luminaire
EN-CEPD D95
Φ95 × 100mm, 8W. Belt only.
Conical luminaire
EN-CEPDM D330
Φ330 × 110mm, 18W. Belt only.
Dome luminaire
EN-CEPDTK D300
Φ300 × 165mm, 18W. Belt only.
The belt.16.5 × 3mm, copper inside a woven jacket. The magnified detail is a crossing: the grooves are what keep one belt's conductors off the other's.
Stage 1 of 4
Set out and fix the nodes
The nodes carry the belt and decide its shape, so they go up first and they go up in the right places. Get these wrong and the run cannot be corrected afterwards without re-drilling.
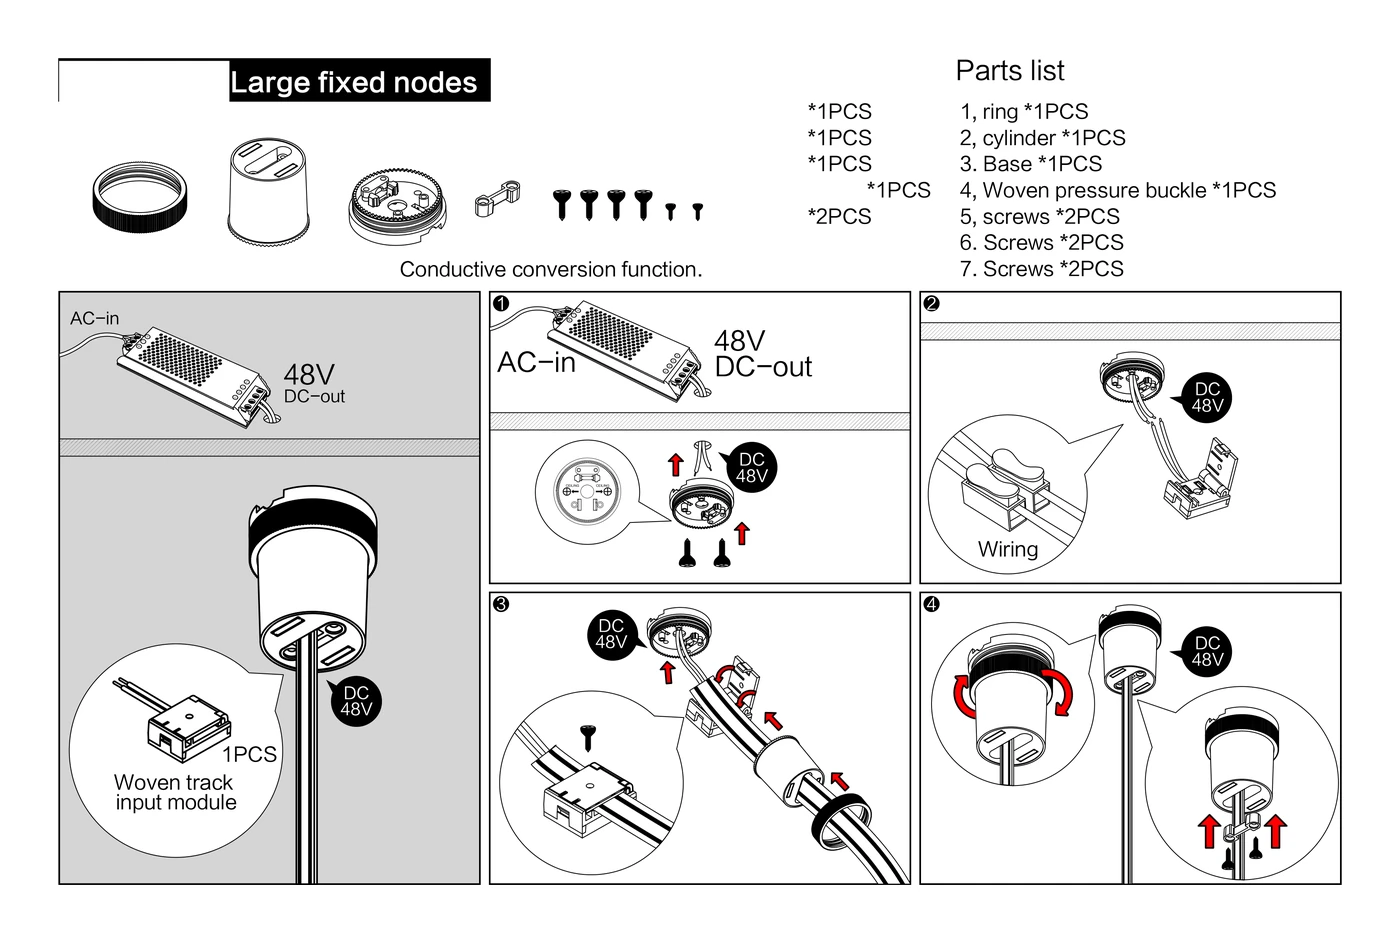
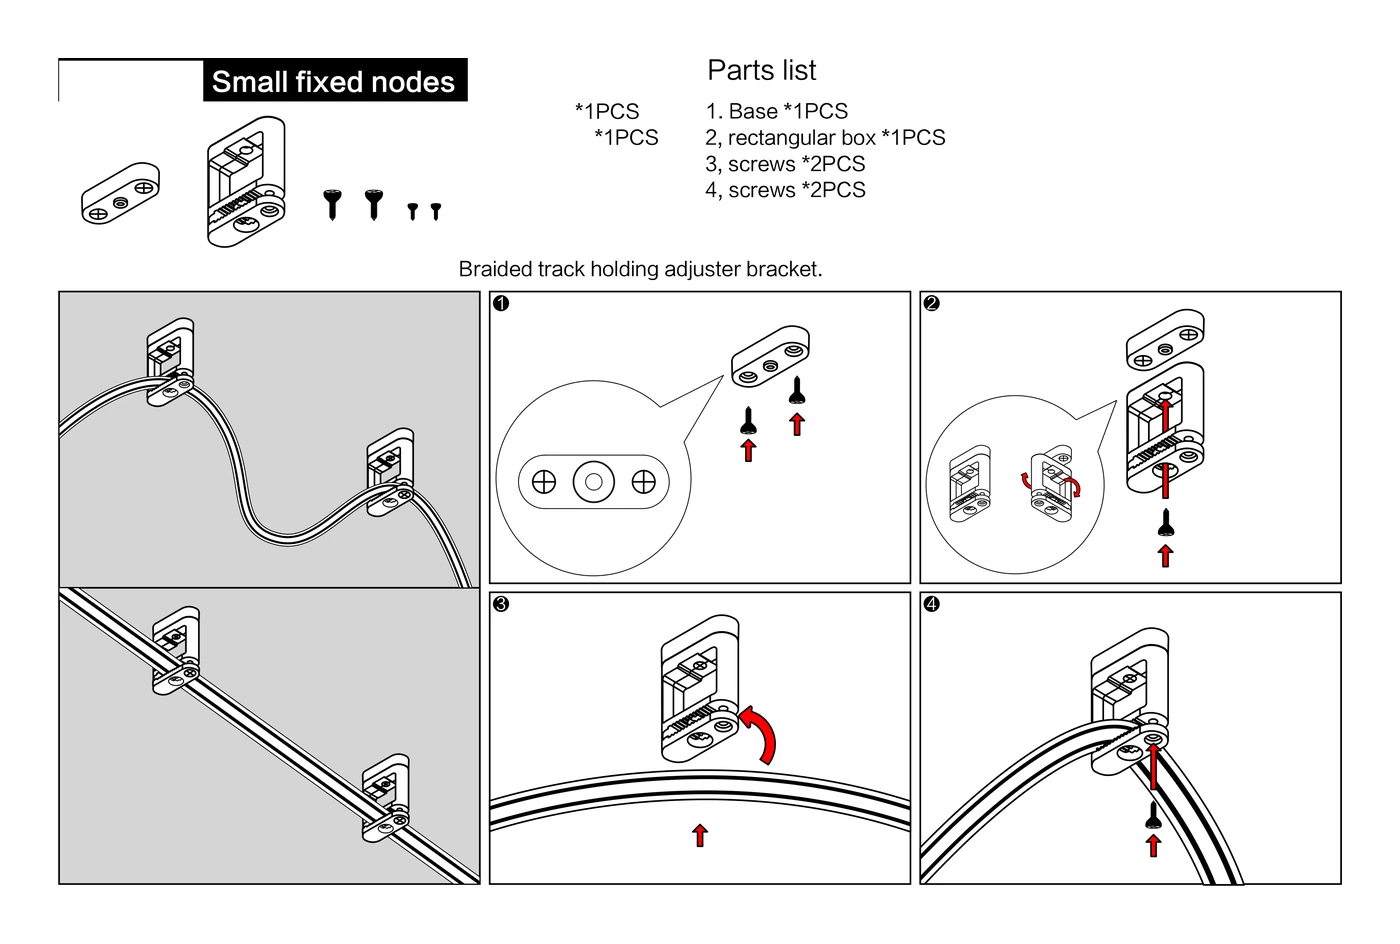
Large node · EN-CEPDYT. The only node that carries current. Power enters here, the run turns here, and two belts join here.Small node · EN-CEPDGK. Holds and adjusts the belt. No power passes through it.
01
Mark every node position
Set the run out on the ceiling from the lighting layout and mark each node. The belt falls in a curve between two nodes: the further apart they are, and the more belt left between them, the deeper the curve.
02
Pick the node for the job
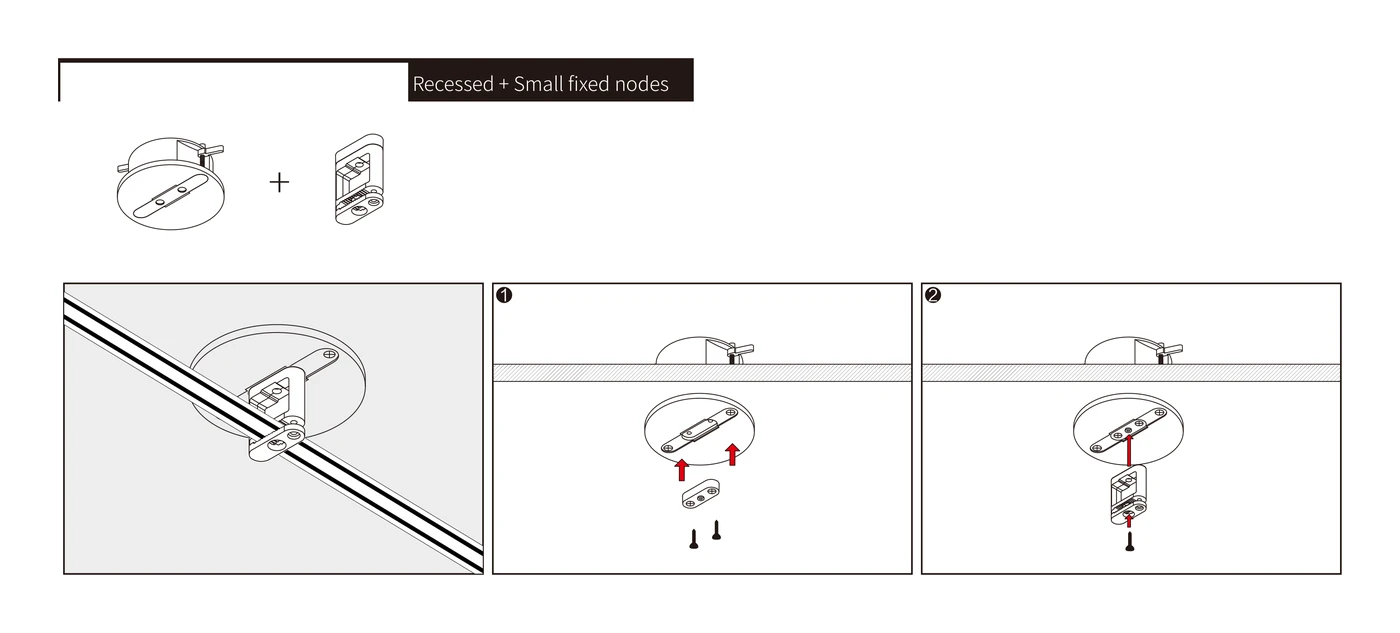
Large wherever power enters, the run turns, the run splits, or two belts join — it is the only node that carries current. Small where the belt just needs holding or adjusting. Recessed where the fixing must not show.
03
Drill and fix
Screw each node to the ceiling, wall or floor. On concrete, drill and plug first. A recessed node needs a Φ65–75mm hole. A node carries the belt, its luminaires and the pull of the curve — fix it into something that will hold.
04
Prove the line
Sight along the fixed nodes before the belt goes up. A node out of line shows as a kink in the curve, and every luminaire on that stretch hangs out of true.
Recessed node · EN-CEPDQR. Into a Φ65–75mm hole, flush with the ceiling.Recessed with a small node. The pair used together where a flush fixing also has to hold and adjust the belt.Ceiling, wall or floor. The same node fixes to all three, so a run can leave the ceiling and continue down a wall.
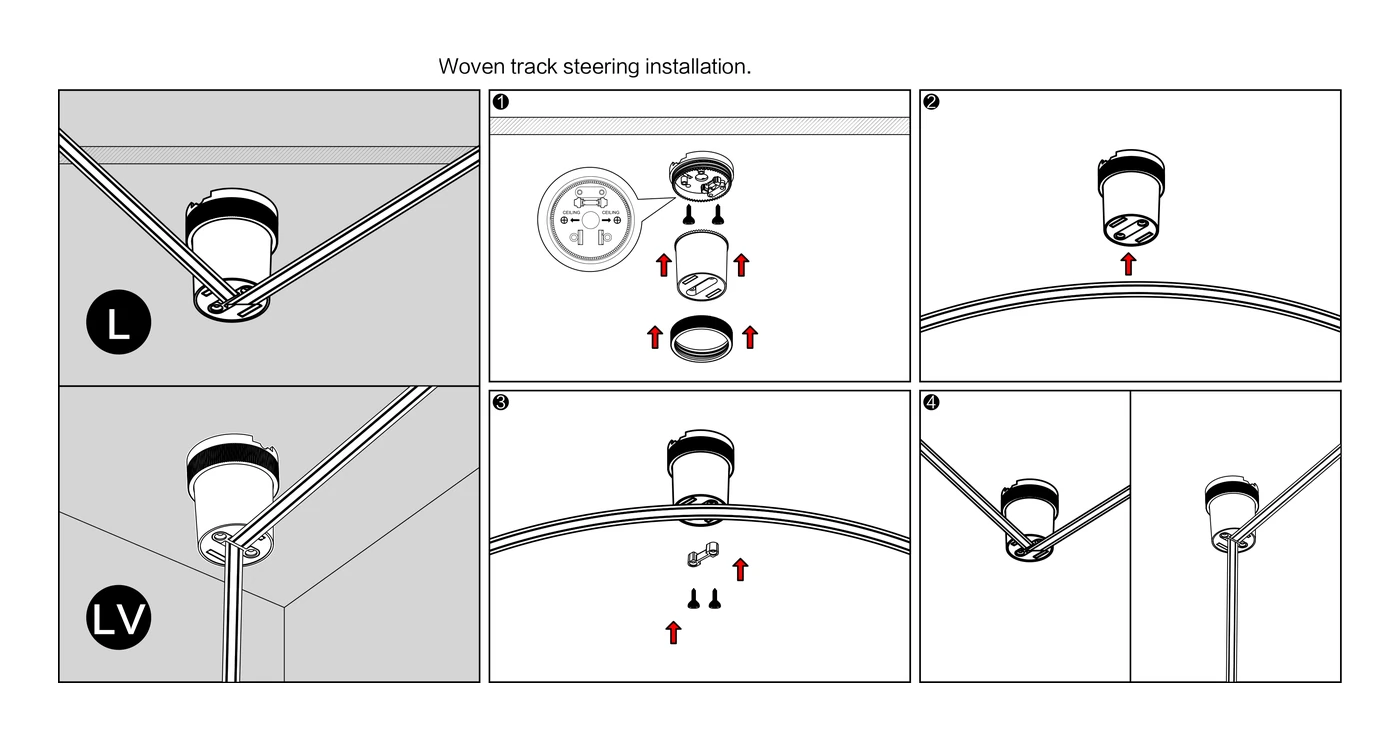
A large node turns the run in any direction, and the same node takes the belt from a ceiling onto a wall or down to a floor.
Turning the run. The belt changes direction at a node, in the plane of the ceiling or out of it.
Stage 2 of 4
Bring in power
Mains never reaches the belt. It is converted to 48V first, and then joins the belt in one of two places. Check the input range on the supply's own label before you connect it.
Option A
Off an aluminium track
Where an Elance' 6mm track is already on the ceiling, the EN-GDH connection box clips onto it, takes 48V straight off the copper strips and passes it into the belt. Push it home until it locks.
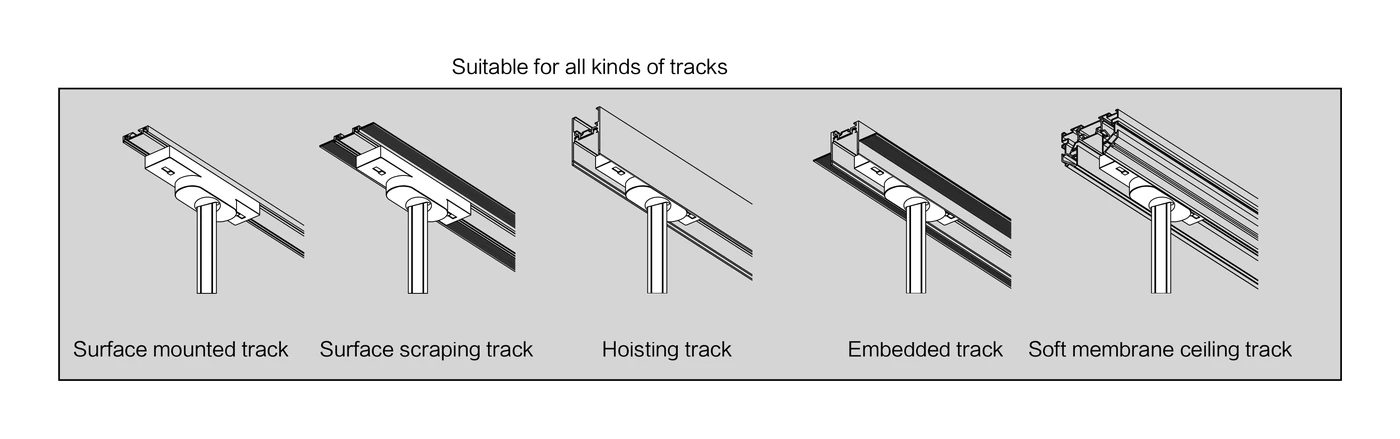
It fits every aluminium profile in the range, so a belt can leave a rigid run at any point along it.
Option B
From a supply of its own
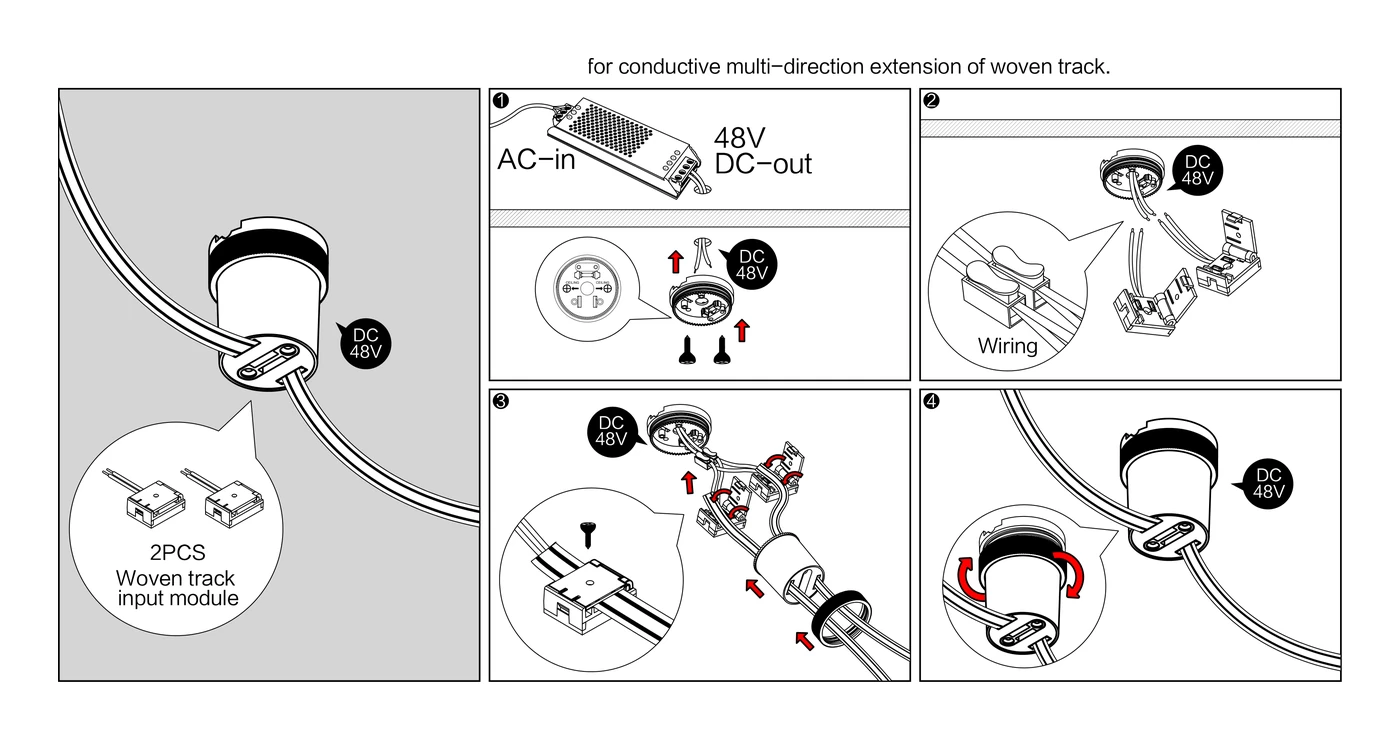
Mount a 48V supply in the ceiling void and bring its output down to the EN-CEPDSR input module, or into a large fixed node. Either puts 48V onto the belt.
Where there is no void to hide a supply in, the integrated supply mounts outside and feeds the same node — that is the route for an open or exposed ceiling.
One supply feeds one run, and a run carries 4.2A — 200W at 48V. Add up every luminaire on the belt and size the supply above that figure; past it, split the ceiling into more than one run and feed each separately.
Stage 3 of 4
Run the belt
The belt goes up last of the structure, threaded through nodes that are already holding. It carries its own current, so where it is joined is also where the power passes.
01
Thread it through the nodes
Feed the belt through each node in turn, leaving the curve you set out. Do not pull it tight unless the design is a straight line — the curve is the point.
02
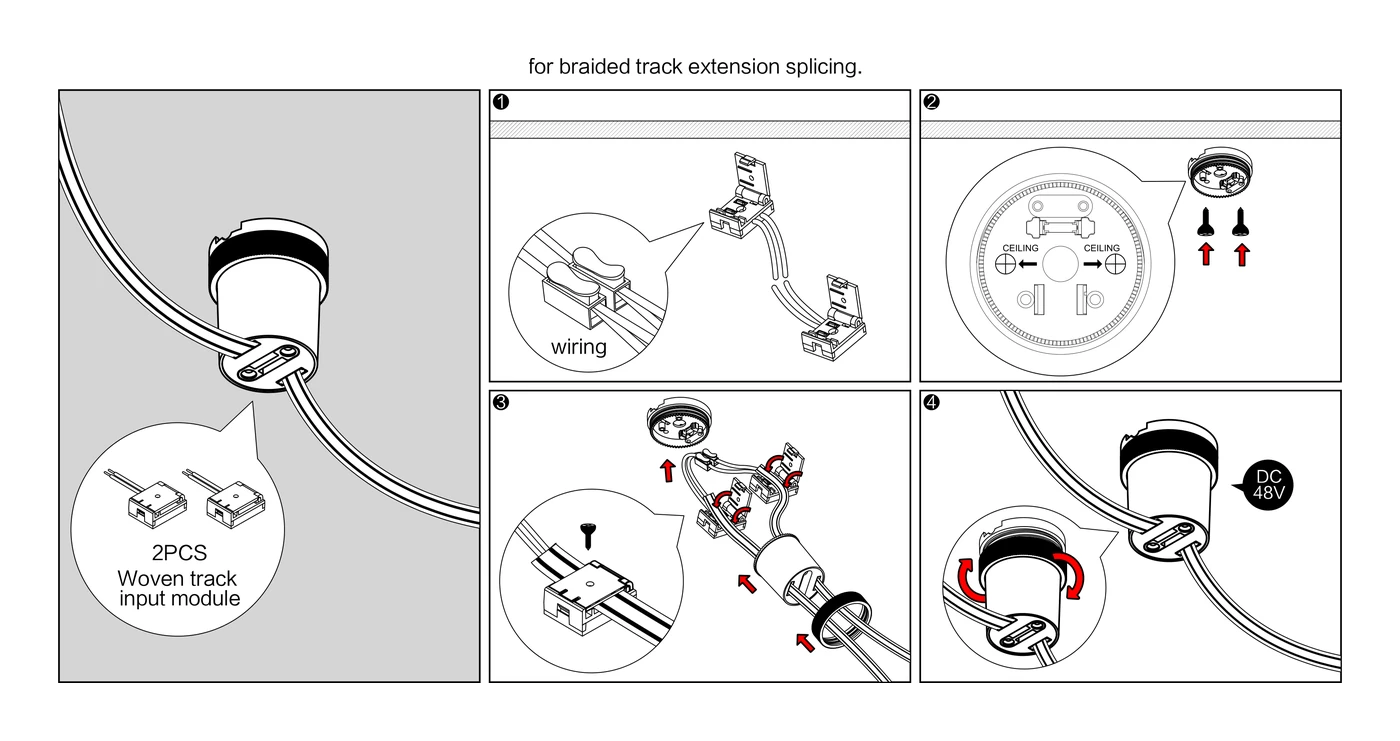
Join and extend inside a large node
Where a run needs more than one length, the two belts meet inside a large node, which carries the 48V across the joint. A small node cannot do this — it holds the belt and nothing more.
03
Shape it and close the end
A woven buckle clamps the belt where the shape has to be held — 2 at a pendant drop, 1 to close the end of a run or to finish it behind a large node.
Two belts may cross each other. The moulded grooves keep the conductors of one clear of the other, so a crossing needs no extra part.
Stage 4 of 4
Mount the luminaires
Two ways onto the belt, and which one applies is decided by the luminaire, not by the run.
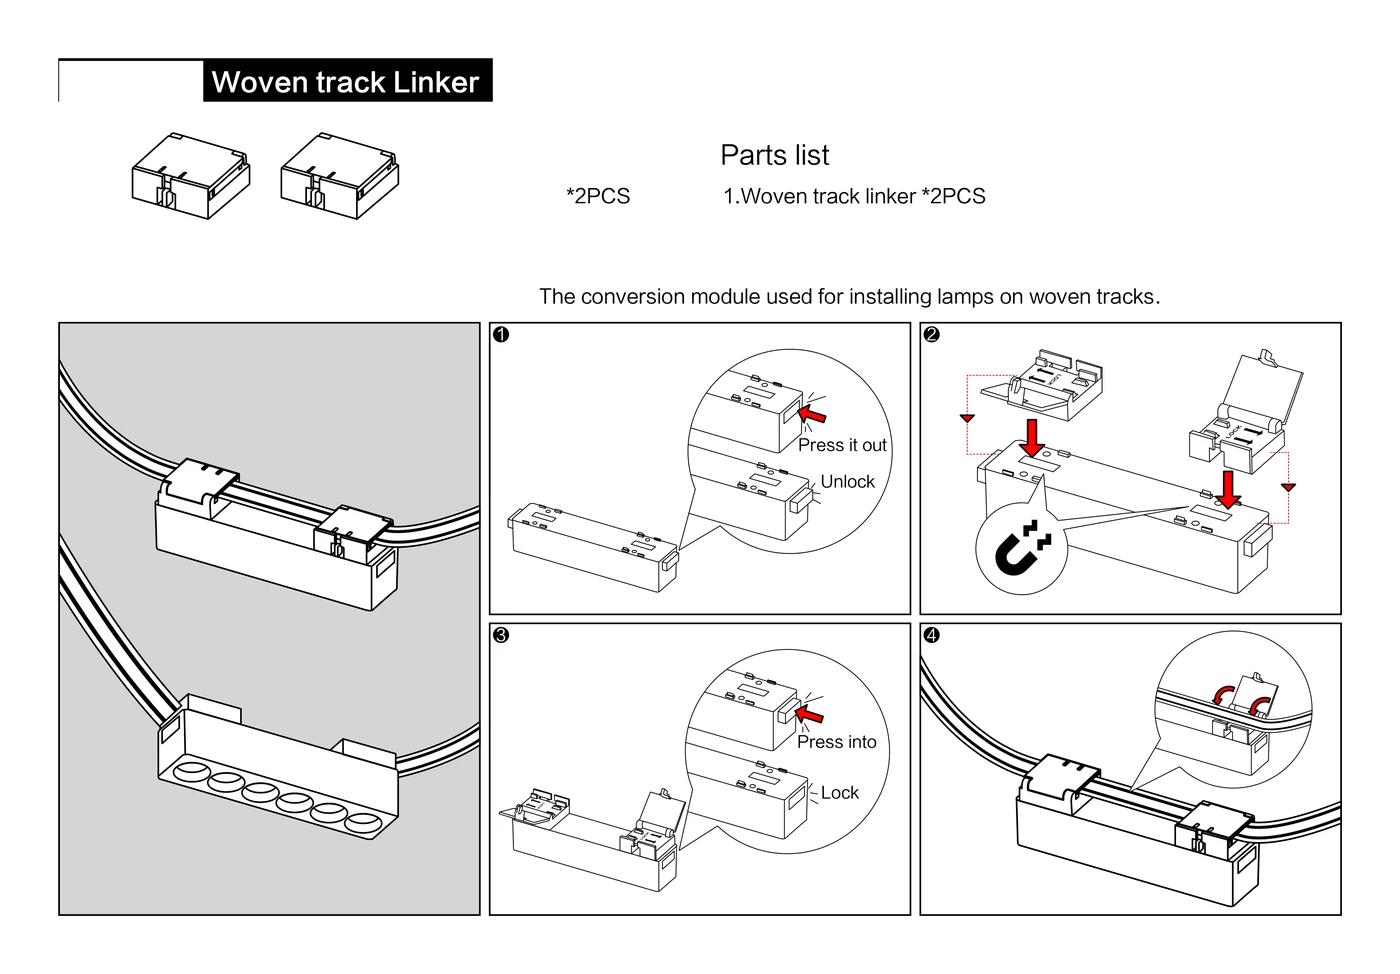
Linker · EN-CEPDDK. Press to open, seat it on the belt, press to lock. Two for every luminaire.
01
Open the linker
Press the catch and the linker opens. Two are needed for every luminaire, one at each end of its magnetic back.
02
Seat it on the belt
Lay the open linker over the belt so the contacts meet the copper, then press it closed until the catch locks.
03
Hang the luminaire
Offer the luminaire up to the two closed linkers. The magnets take it and it lights as the contacts meet. To move it, release both linkers, slide along the belt and lock them again.
Made for the belt: the Poke Ball, Conical and Dome need no linker and fit nothing else. Everything else in the Elance' range goes on the belt with two linkers.
If something is dark
Three checks, in the order they usually turn out to be the answer.
One luminaire does not light
A linker is not fully closed, or the luminaire is not seated on both. Release both linkers, press each one shut on the belt until it locks, then offer the luminaire up again.
Everything past a node is dark
That node is not carrying the current across. Only a large node does — check the belt is fully seated in it and the connection inside is made. A small node holds the belt and passes no power, so a join made at one leaves everything beyond it dark.
The whole run is dark
Start at the supply. Check the mains side at the junction box, that the connection box or input module is seated and locked, and that the total luminaire wattage on the belt is inside the supply's rating and under 200W.
Still dark? Send us a photo of the run and the supply and we will work it through with you on WhatsApp.
Planning a run?
Send the ceiling plan and we will come back with the node positions, the belt length, the supply rating and the luminaires, listed in the order they go up.