Cylinders, panels and wall lights fixed straight onto a ceiling or a wall — an RCC slab, brick, AAC block or a false ceiling. Written for the electrician on an Indian site: print it and take it up the ladder.
Mains off first.Switch off the circuit's MCB at the distribution board (DB) and prove the wires dead with a tester before touching anything.
Over the point.The light's base must cover the point. Check there is a junction box — or the end of the casing-capping — exactly where the light goes, before any hole is drilled.
Never into the board alone.Never fix a light into gypsum or POP board alone. Screw into the GI section above it, or into a backing piece fixed there before the ceiling is boarded.
Install to local and national electrical regulations, and only by a licensed electrician.
These are indoor lights for dry places. Outdoor walls, soffits and anywhere rain can reach have their own guide.
1
Stage 1 of 4 · Step 1
Know the surface
Most surface lights that come loose were fixed with the wrong plug. Find out what is behind the plaster before choosing the fixing.
1
Find what you are fixing into, and use its fixing.
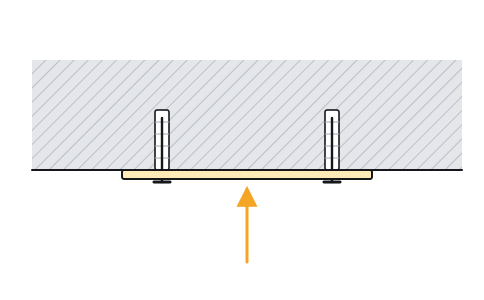
RCC slab
Nylon plugs in drilled holes, screws through the light's base. The plug must sit flush with the finished ceiling, not proud of it.
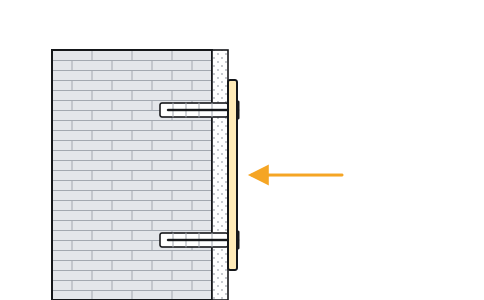
Brick wall
Drill through the plaster into the brick itself. A plug in a mortar joint or in plaster alone does not hold — move the hole onto a brick.
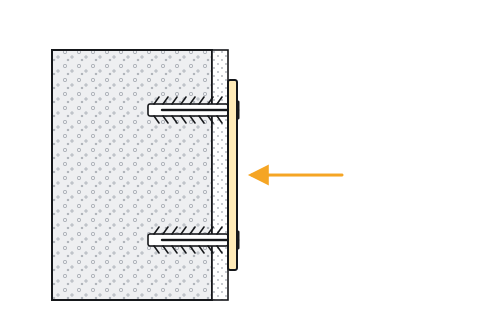
AAC block wall
Ordinary plastic plugs spin in the soft block and pull out. Use anchors made for AAC blocks, with wide fins that grip the block.
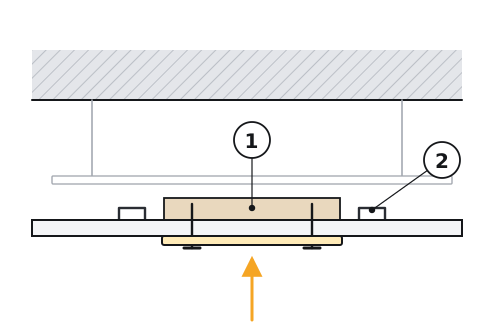
False ceiling
Screw through the board into a GI section, or into a ply backing piece laid across the sections before boarding. Gypsum or POP board alone will not carry a light for long.
2
Stage 2 of 4 · Steps 2–5
Mark and drill
The light's own base is the template.
2
Hold the base up and mark
Centre the light's base on the point, turn it to the angle you want the light to sit at, and mark through its fixing holes.
CarefulDo not fix a light to fresh plaster. Let the wall or ceiling cure first — plaster is normally cured for one to two weeks.
3
Drill to the plug's length
Use the bit size the plug asks for, and drill a little deeper than the plug is long so it can go fully in.
CarefulDrill plaster with a masonry bit in normal drilling mode, not hammer mode, or the plaster cracks around the hole. If the bit hits a steel bar in the slab, move the hole.
4
Clean and plug
Blow the dust out of each hole and tap the plug in flush with the finished surface.
5
Check the line
For a row of lights, or a wall light, check the marks against a line or a level before drilling the rest.
3
Stage 3 of 4 · Steps 6–9
Connect
The wires come out of the junction box behind the light, and the connection stays inside the box or the light's base.
6
Bring the wires out
Bring the point's wires out through the base and find live, neutral and earth with a tester.
CarefulBoth colour habits are in use, often in the same building. A colour is a clue, not proof: find the live wire with a tester before connecting anything.
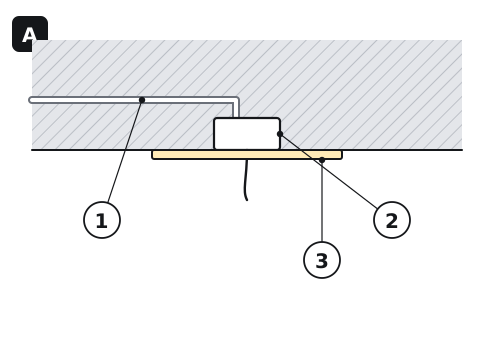
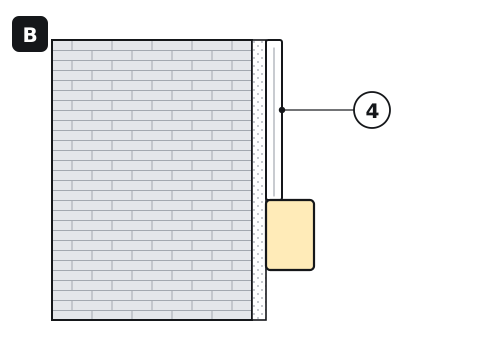
Where the wire comes from. A · ① conduit inside the slab, ② the junction box, set flush, ③ the light's base over it. B · on a finished wall with no conduit, ④ PVC casing-capping runs on the surface to the light.
7
Connect in a connector
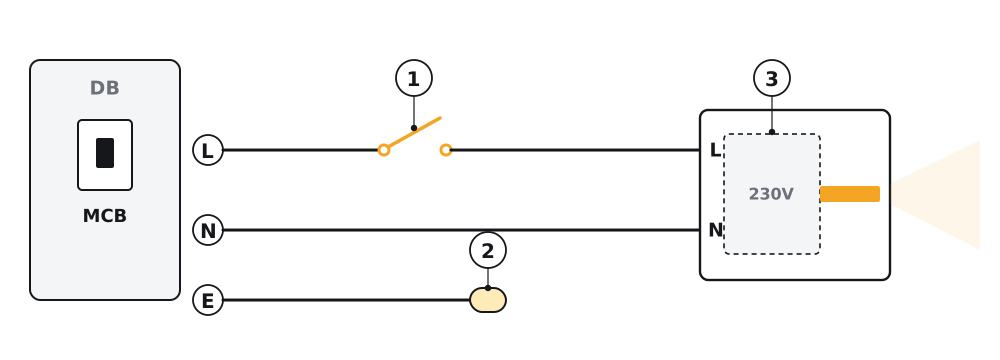
Join live and neutral in a connector or terminal block. Cap any earth on its own — see The wiring.
CarefulThe switch must break the live (phase) wire, never the neutral.
One light, two wires. ① The switch breaks the live. ② An unused earth is capped in its own connector. ③ Most surface lights carry their driver inside the body, so the mains goes straight to the light's own input.
8
Nothing pinched
Tuck the joints into the box so no wire is trapped between the base and the ceiling when the screws go in.
9
Switch on and check
Switch the MCB back on and try the light before it is fixed, then switch off again at the MCB.
4
Stage 4 of 4 · Steps 10–13
Fit and aim
The base goes up first, the body last. Every model does it one of three ways — look at what came in the box before the base goes up.
10
Fix the plate or clamp
Screw it to the plugs from Stage 2, centred on the point, with the wires brought through it.
11
Connect
Make the connection as in Stage 3 and tuck it into the box, clear of the plate.
12
Put the body on
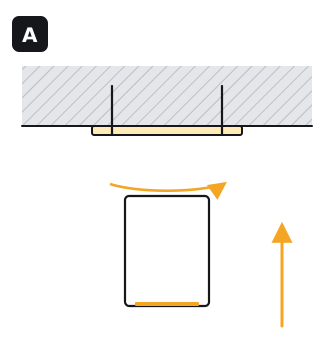
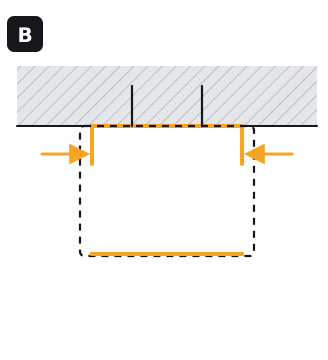
Twist it onto a plate or a Y clamp until it stops, or push it up over a C-shaped strip and put in the side screws. Never hang the body by its wires while you work.
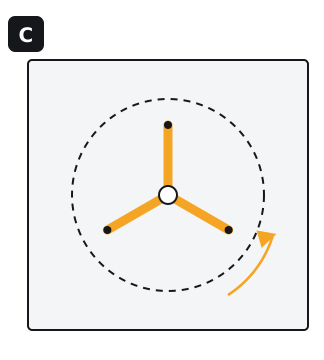
Three ways the body meets its base. A · a plate screwed to the ceiling; the body is offered up and twisted on. B · a C-shaped metal strip screwed to the ceiling; the body goes up over it and is fixed with screws through its side. C · a Y-shaped clamp screwed up; the light is pressed to it and twisted until it locks.
13
Aim adjustable lights
Tilt and turn an adjustable head by hand with the lights on, so you can see where the beam lands.
Other fittings
The same stages, with one difference each.
2 × 2 panel on a surface box
The concealed 2 × 2 panel sits inside a fabricated metal box. Screw the box's clamp to the ceiling, lift the box onto it and fix it with screws through the holes in its sides. Nothing is screwed through the back of the box.
Surface linear
The driver is inside the profile. Depending on the version, the profile is screwed to the ceiling through its back, fixed to clips at the back, or hung on a wall bracket — check which fixing your version has before drilling, and set out the whole run with a line first.
Wall lights
Fix to the wall exactly as in Stage 1 — into the brick, or with AAC anchors — at the height on the lighting drawing, and check the marks with a level. Where the wall has no conduit, PVC casing-capping brings the wire to the light.
If something is wrong
Four checks, in the order they usually turn out to be the answer.
A light comes loose or sags
It was fixed with the wrong fixing for the surface: plain plugs in an AAC block, screws into gypsum alone, or a plug in a mortar joint. Take it down and refix it as in Stage 1.
The body will not go home on its base
Something is in the way — usually wires bunched under the plate, or a plate pulled out of flat on uneven plaster. Tuck the joints into the box and check the plate sits flat before trying again.
Lights glow faintly or flicker when switched off
Most often the switch is breaking the neutral instead of the live — move it to the live. A switch with an indicator lamp can also leak enough current to make LEDs glow; change it for a plain switch. Long cable runs sharing a conduit with other circuits can do the same.
Lights fail after a storm or a voltage surge
A driver takes a surge up to its rating, and no further. Where the supply is unsteady or lightning is common, fit surge protection (an SPD) at the DB.
Still not right? Send us a photo of the light, the driver's label and the switch, and we will work it through with you on WhatsApp.
The wiring
Three things decide it: which wire is live, what happens to the earth, and how the light is controlled.
Letter
Wire
Colours you may find
L
Live (phase)
Red — or brown in newer wiring
N
Neutral
Black — or blue in newer wiring
E
Earth
Green — or green-and-yellow
The earth wire
Most of our lights
No earth terminal
Connect live and neutral only. If an earth wire is waiting at the point, do not cut it and do not join it to neutral: put it in its own connector and fold it back into the ceiling, so it is there for whatever is fitted later.
A few products
An earth lead on the light
Some higher-wattage and outdoor lights come with a third, earth lead. That lead must be connected to earth. If the point has no earth, run one from the DB before the light is fitted.
How the light is controlled
Driver
Wires at the point
What to know
On / off
2 · L N
Any ordinary switch on the live wire.
3-in-1 colour
2 · L N
Wired like on / off. Switching off and on again moves the light to its next colour. There is no selector on the driver.
TRIAC dimmable
2 · L N
The wall switch is replaced by a phase-cut (TRIAC) dimmer on the live wire. Fit one light and try the dimmer across its whole range before fitting the rest.
DALI-2
4 · L N DA DA
Two more wires, the DALI pair, run from light to light to the DALI controller. The pair has no polarity: either wire can go to either DALI terminal. The automation contractor commissions the system.
Bluetooth mesh + RF
2 · L N
Controlled from the app or the remote. Leave the wall switch on: switching it off cuts the driver, and the app loses the light.
Planning the lighting?
Send the ceiling or wall plan and we will come back with the lights, their fixings and the points they need, listed in the order they go up.